Showing posts with label common core. Show all posts

Sunday, December 1, 2013

MINTY MATH FOR KINDERGARTEN & FIRST GRADE


Welcome to December—the eternally busy month where it seems as if there are never enough hours in the day, enough hands to do the work, and enough dollars to do it with.
As refreshing as a peppermint, the posts this month will provide activities and ideas for those that are somewhat busy, those that are very busy, and those that are—Are you kidding? When will I ever find the time to do that?! busy. If you are too busy to read this blog, don’t worry— these posts will still be here in January when the whirlwind of December is behind all of us.
If, however, you fit into the first category, take the time to drop a peppermint into your cup of cocoa and check out these ideas to use that winter-fresh candy with the little ones in your life.
Whether they are the real starlight mints and candy canes or the printable versions, these sweet treats provide wonderful opportunities to practice many math skills.
Included below are printables and suggestions for practicing math skills that include counting, single-digit addition, identifying shapes, sorting, non-standard measurement, comparing numbers of objects, sequencing, and more. Created by Rainbows to Snowflakes, this candy cane and starlight mint themed resource will provide ideas and materials to use in math centers, as warm-up activities, and small group practice for kindergarten and first grade.


This post has been shared on the following blogs. Please check them out:

Something 2 Offer dot Com

ABC Creative Learning dot Com

Enchanted Homeschooling dot Org


Monday, October 7, 2013

CANDY CORN or CORNY DUCKS~HOW TO FIND THE RIGHT BALANCE


Whether you teach in a public school, a private school, or homeschool, one of the challenges you face is finding the right balance to your educational endeavors. If you drill, drill, and drill some more, your children may tune out and are less likely to retain the valuable information and skills that you address. However, if the day is filled with nothing but fun and games, your children may miss out on practicing skills and internalizing much-needed information. How, then, do you strike that perfect balance?
One way is to involve your students as much as possible in the learning process. As you teach, keep communication lines open. Ask questions and answer their questions. Discuss how the skills they are practicing and the knowledge they are acquiring will transfer to other areas.
If we as educators begin this technique with children at a young age and provide meaningful lessons and activities, then our efforts will help raise children that are thinkers, doers, and problem solvers.

In an effort to help find balance, today’s activity will encourage your children to learn concepts and transfer those concepts to real-life situations. In a nutshell (or cornhusk), the activity will encourage your children to think, solve problems, and have fun while doing it.
CANDY CORN OR CORNY DUCKS—HOW TO FIND THE RIGHT BALANCE
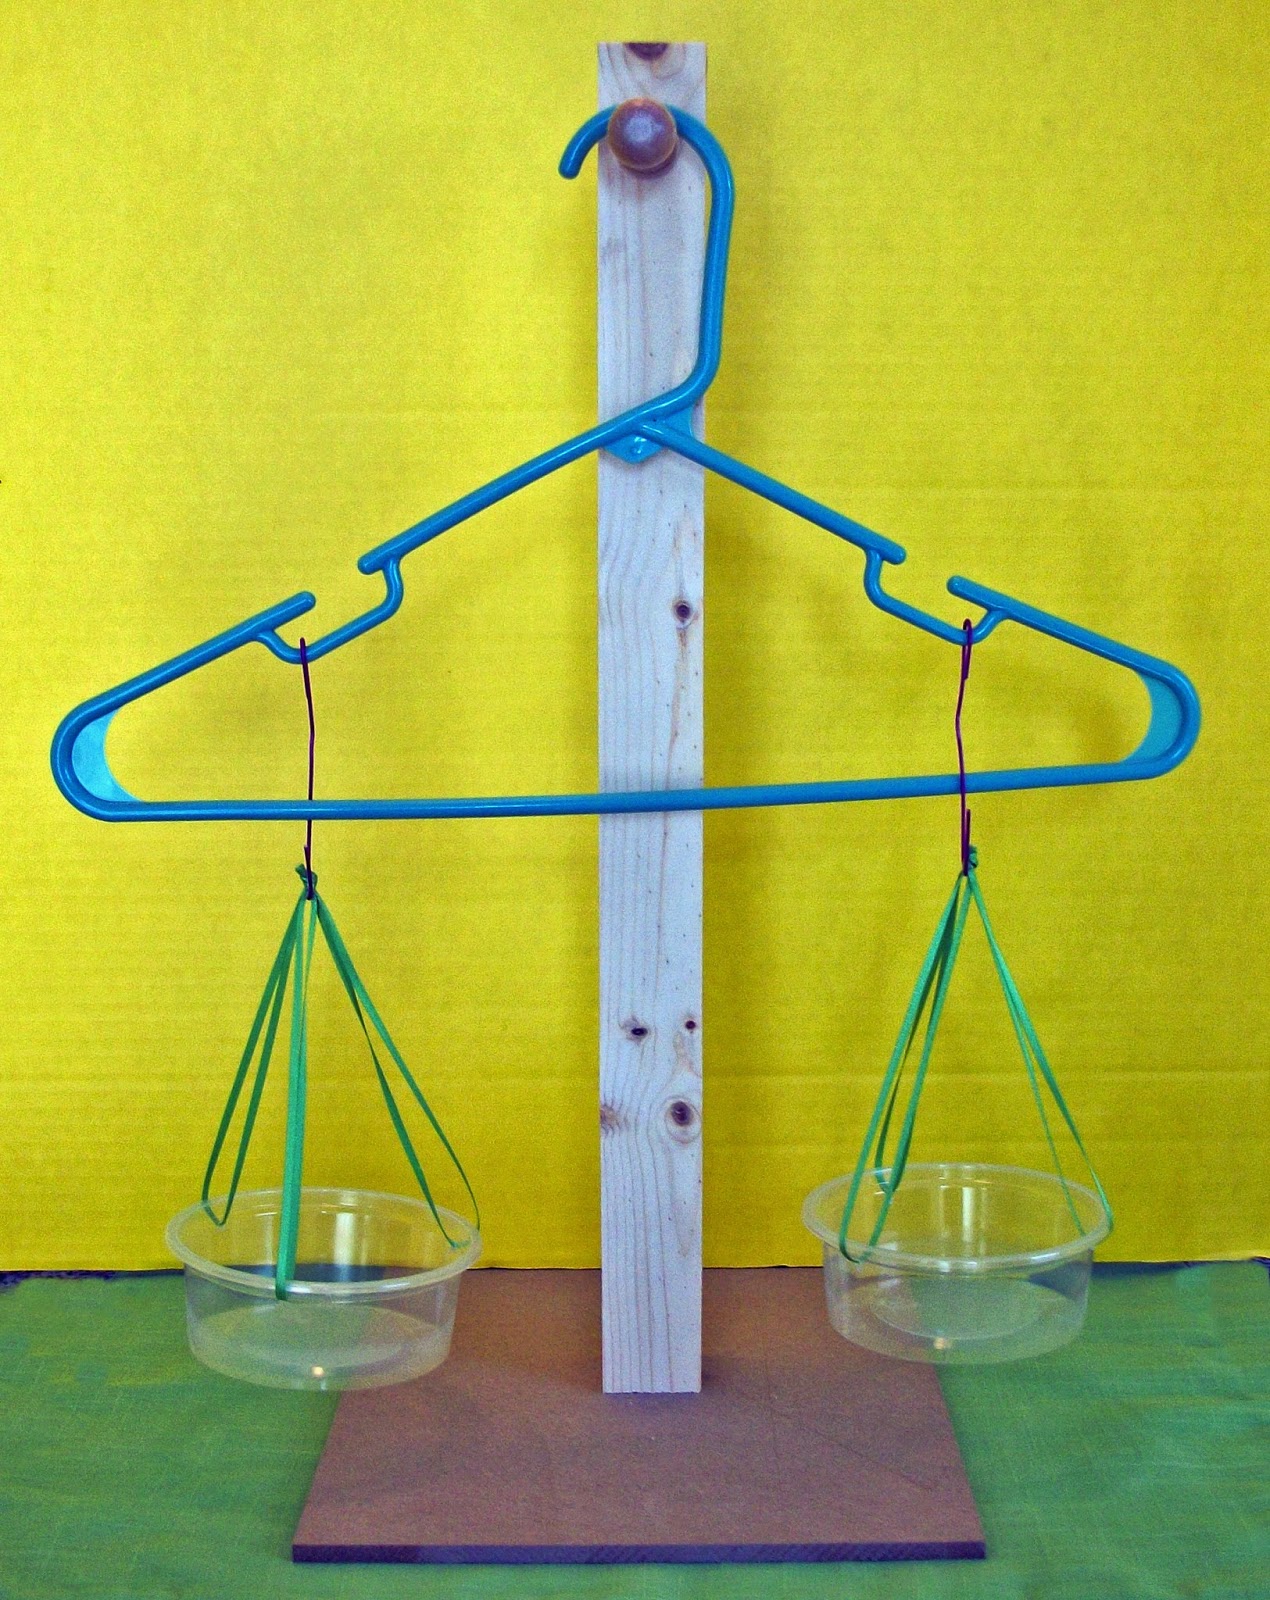
This activity consists of 2 components—creating a balance from household items and using that balance to teach and practice the concept of more and less as well as making predictions.

Grade Range: K – 2
Time to complete: 30-45 minutes
VA STANDARDS of LEARNING: Math K.2; K.8; 1.9
COMMON CORE STATE STANDARDS: CCSS.Math.K.CC.B.5; CCSS.Math.K.CC.A.3; CCSS.Math.2.OA.C.4

ACTIVITY DESCRIPTION: Students will place objects on a balance in order to compare the mass of those objects. They will count the pieces needed to move the balance pivot point to the middle. They will then make predictions on doubling or tripling those items and use the objects to determine if their predictions were correct. Students will then create number sentences to represent their findings.
PLEASE NOTE: The balance created and the balance purchased from an internet source are not devices that present truly accurate readings. They are suitable for demonstrating the concept of more, less, or the same.

MATERIALS:

MATERIALS NEEDED TO CREATE HANGER BALANCE:
Plastic hanger with hook loops
2 clear plastic containers or cups
2 paper clips
Ribbon
Hole puncher
Scissors
Ruler
Fiber board base: 2 x 2 piece of wood, hat hanger dowel, nails (OR hang the balance on a
doorknob)*

MATERIALS NEEDED TO COMPLETE THE ACTIVITY:
Set of October-themed objects (rubber ducks used for demonstration)
Candy corn and pumpkins
Small can of corn Pencil
Worksheets (provided)
Balance: Either hanger balance or balance from a retail source


INSTRUCTIONS:
Hint: The creation of the hanger balance can either be conducted as a class project or prior to completing the counting and balancing activity. Due to the small parts of the balance, it is recommended to create the balance prior to the activity for children under the age of 6.

MAKING THE HANGER BALANCE:
For best results, this balance can be used to compare objects that are less than 1 lb. in weight.
1. Using the hole punch, make 3 holes near the top of each plastic container, placing the holes equal distances apart, as shown.

2. Cut 6 lengths of ribbon that are 15 inches long, as shown.
 3. Thread the ribbon through the holes in one of the containers, as shown.

4. Align all 6 ends of the ribbon and tie them into a single knot. This knot will be used to hang the container on the paper clips at each end of the balance.
5. Repeat for the second container.
6. Open both paper clips so that one end is still bent. Bend the straight end over each end of the hanger. 
 *7 Door Knob Pivot Point: If you use a doorknob as the pivot point, your balance is finished. When in use, place the knots of the ribbons onto the paper clips AFTER adding the items to be balanced.

*7. Base Pivot Point:
A. To create the base nail or screw the 12” by 12” fiber board to the end of the 2’ x 2”.
B. Screw the hat hook onto the top of the 2 x 2” leaving approximately 1” as a buffer.

 
HOW MUCH CANDY CORN DOES IS THE SAME AS REAL CORN?

This activity is contains suggested uses for the classroom balance. Modify the instructions to meet the needs of your children.
 
1. Prior to conducting the activity, demonstrate what a balance does and how it works. As this activity involves using candy corn, one suggestion is to divide the class into 2 groups and assign a side of the balance to each group. Then pour a small bag of candy corn into the balance reservoir.
Ask: Do you think this is a fair way to divide the candy corn? How could we do this better without actually counting out ALL of the candy corn?
Then move some of the candy corn into the empty reservoir until the balance pivot point is in the middle.
2. Tell the students that they will use candy corn as a unit of measure to discover how many pieces of candy corn have the same mass (stuff)* as those objects.
A. Place a small can of corn into the balance reservoir.
B. Have the students predict how much candy corn it would take to equal the same mass (stuff) as the can of corn. Count the pieces and place them in front of the balance. Record their prediction.

C. Slowly add the candy corn to the empty reservoir.


D. If their prediction was too low, add more candy corn one-at-a-time until the reservoirs are the same level. If their prediction was too high, remove the candy corn one-at-a-time until the reservoirs are balanced. Record the final count.
3. Repeat the process using candy pumpkins and candy corn, rubber ducks and candy corn, etc.

 4. Extend the learning: This activity is great for addressing multiplication, counting on, ratios, etc.


TRANSFER THOSE SKILLS WITH BALANCE ON THE PLAYGROUND: If you are lucky enough to have access to a see saw, then apply the skills approached in the activity to balancing students. This is a great opportunity to springboard into a discussion of simple machines.


OR...
POST A COMMENT ON THIS BLOG**

*This giveaway will include the balance shown above for parents and teachers of children over the age of 4. The registration will last from the posting of this blog post until midnight, October 20, 2013. One winner will be randomly selected from the entries. The balance will be shipped from Amazon within approximately 2 weeks following the close of the giveaway. The giveaway is open to residents of the United States with a United State’s mailing address. The winner’s name will be posted on the blog, unless the winner chooses not to have his/her name posted.
**To be considered for entry into this giveaway, the entrant’s email address must be submitted to the blog administrator.

THIS POST HAS BEEN SHARED ON THE FOLLOWING BLOGS. PLEASE CHECK THEM OUT:

Kids Activities Blog dot Com

The Mom Maven dot Com

The HomeSchool Village dot Com

No Time for Flash Cards dot Com


BALANCE GIVEAWAY UPDATE, OCT. 21, 2013:

Congratulations to Berdine from FL, the winner of the balance and educational treat. I hope your little ones have fun with them.

Thank you to all that entered this giveaway. Please check back in early November for a very special giveaway.


Monday, September 9, 2013

DECOMP PROJECT: My Goodness, That's a LOT of Water!

Your Decomp Project is under way and your students have adjusted to their daily trek to the classroom. Those changes are behind you. However, big changes in weather patterns are still on the horizon. In our area we have progressed from the soggy summer to the unpredictable weather patterns of the fall. In fact, since our rainfall on September 1, we have had nothing but sunny days. However, I am certain that the sun will soon be replaced with downpours and all out gully washers. With the inevitable heavy rains ahead, I thought I’d take this opportunity to provide the first of my connection activities to accompany the Decomp Project.(Link)

On those days where your area can easily receive 2 or 3 inches of rain in a 24 hour period, you might begin to wonder how on earth your little ones are going to manage to get all of that water into the decomp tub without spilling it. During the setup you placed the lid under the tub to catch the water run off. This is the time to remind you to regularly empty that lid, so that you do not end up with a muddy mess on your classroom floor.
Hint: If a huge autumn storm is predicted in your area, I recommend that you move the decomp tub to an outdoor location until the rain has stopped. Make sure it is placed where the drainage holes can do their job!

Now, back to the activity—an efficient way to make ‘rain’ fall on your decomp tub that is paired with a math connection.

Adults and children know that a gallon is bigger than a cup. How many times have your little ones tried to pick up a full gallon of milk only to find out it’s a bit more than they can handle? With that in mind, this quick activity and visual aid can help your ‘rainfall’ days with your decomp tub run more smoothly.
MY GOODNESS THAT’S A LOT OF WATER!
While this activity is intended to be conducted as an extension to the Decomp Project, it can easily be modified to serve as a stand-alone activity.

HINT: This initial measurement activity takes a long time to complete (60-75 minutes). It can be divided into more than one session. Once this activity has been completed, it lays the groundwork for a faster and more efficient way to transfer rain water to the decomp tub.
Virginia: Math Standards of Learning: VA SOL 2.11c; 3.9b
*Common Core Connection: CCSS Math Content 3.Md.B; CCSS Math Content 4. Md.A
*The common core standards base liquid measurement in terms of liters. If you are following the Common Core  State Standards to the letter, then substitute liters for gallons. The visual aid will not apply. It may not be suitable in classrooms that strictly adhere to the metric system of measurement.

ACTIVITY DESCRIPTION: Children will use various containers to build understanding of the concept of volume. They will pour water from one container to another and draw conclusions about different units of liquid measurement. They will compare volume in forms of cups, pints, quarts, and gallons.

MATERIALS:
Decomp tub (link to set-up andmaterial list)
Additional plastic tub the same size as the decomp tub
Containers for liquid volume: cup, pint, quart, gallon
Funnel *optional
Permanent Marker
Ruler
Rain Gauge
Visual Aid Chart (provided)
Watering Can


INSTRUCTIONS:
1. Prior to conducting this activity, gather various containers that hold cups, pints, quarts, and gallons.
2. Show the containers (pint size shown) to the students.
Ask: Which container do you think holds the most amount of water? The least?
ALL CONTAINERS HOLD 1 PINT
3. Using the 1 cup measuring cup, fill each container with water. Count the number of cups required to fill each container. Explain to the students that all of these containers hold the same amount of liquid. Discuss why the containers can look different, but still hold the same amount of liquid.
4. Show an example of each of the following liquid measurement containers to the students: cup, pint, quart, and gallon. For younger students, writing the size on the container with a permanent marker is recommended. (Cup-C, Pint-P, Quart-Q, Gallon-G)
**5. Mark the inside of the tub with permanent marker to indicate inches of rain (half inch increments for second and third grade).
**6. After the rain falls in your area, bring the rain gauge into the classroom. Show the gauge to the students and discuss how much rain had fallen. For grades K-1, estimate to the nearest inch. For grades 2-3, estimate to the nearest half inch.

**7. Fill the large tub with water to match the level of water in the rain gauge.

7. (Stand Alone Activity Step) Fill the plastic container approximately half way with water.
**8. Using the cup-sized measuring cup, take turns filling the watering can with water, counting the number of cups it takes to fill the can. This step does not need to be completed until the can is full. The intent of this step is to show that it takes MANY cups to fill the can.

Ask: Which container do you think would be a faster one to use to fill the watering can? Why?
**9. This is the opportunity to assist students with making connections between container sizes as well as provide an easier way to ‘water’ the decomp tub.. Suggest that while the gallon container provides challenges, it might be the fastest way to get the water from the rain tub to the decomp tub. First, the students must determine how many gallons it takes to reach the level of water from the rainfall.

10. Take turns using the cup-sized measuring cup to fill the gallon container, scooping the water from the plastic tub. Count the number of cups necessary to do so (16). Repeat this process until the plastic tub is empty. If the gallon container is not full at the end, use the visual aid to determine how much of the gallon container is actually filled.
 
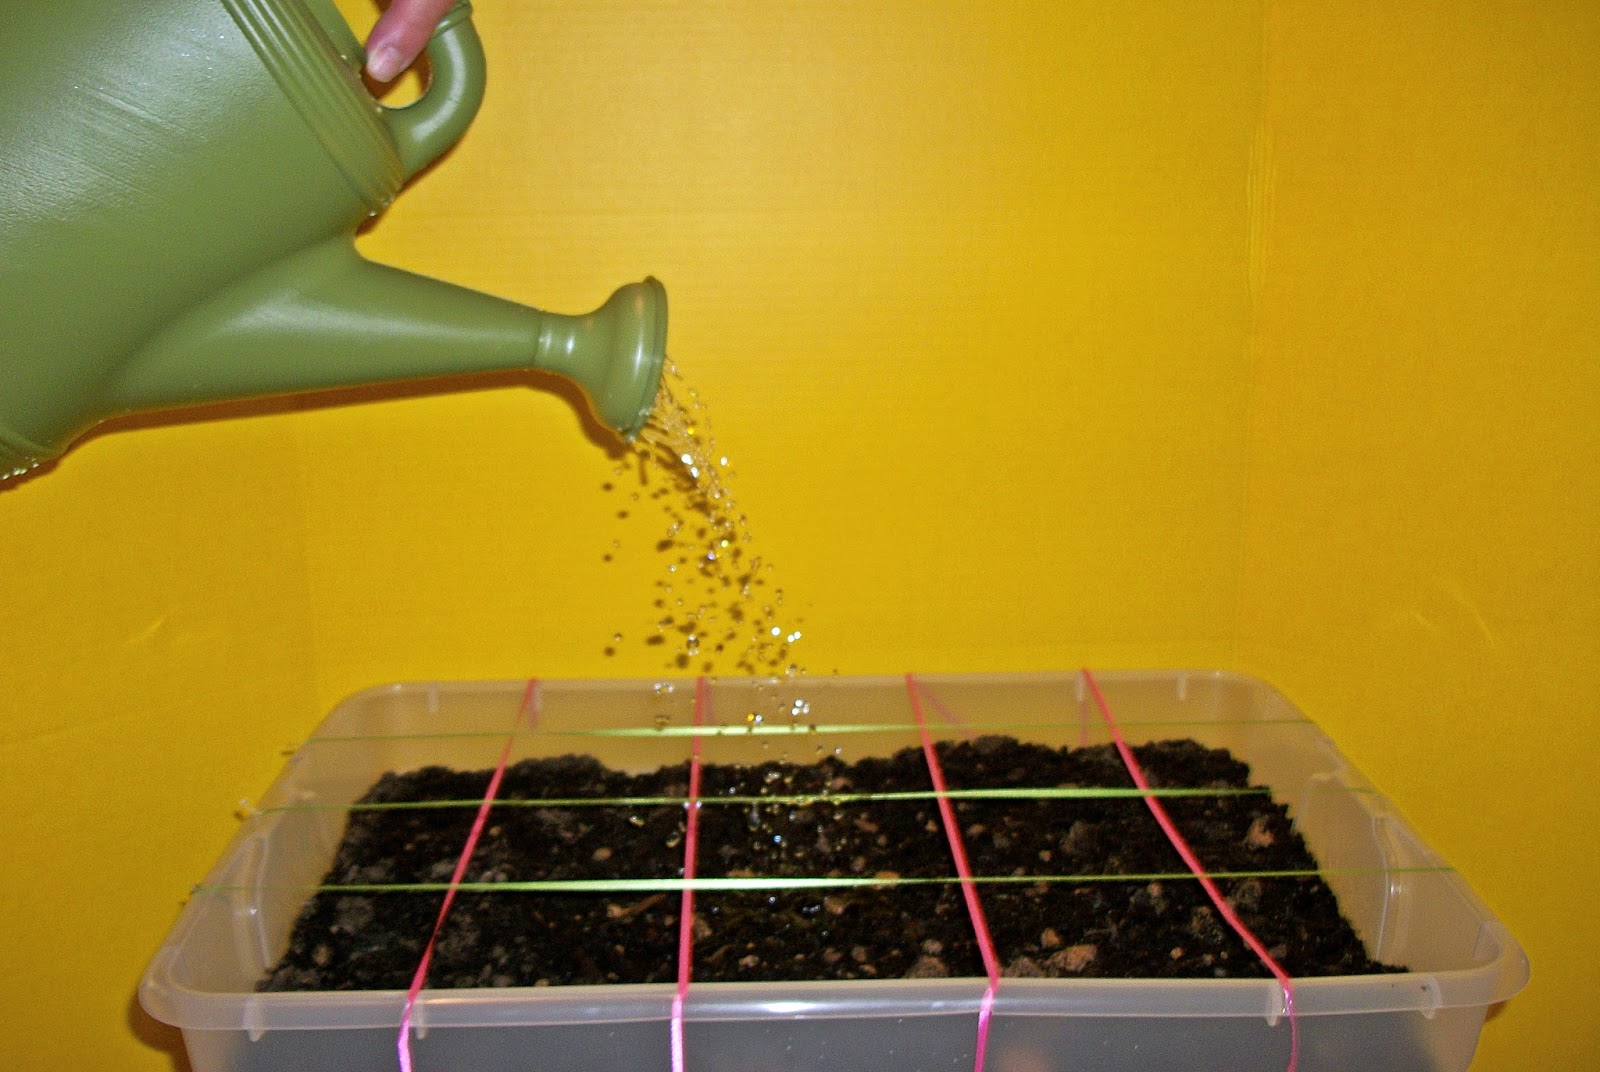
**11. Each time the gallon container is filled, the teacher or parent can use that to fill the watering can. Sprinkle the watering can over the decomp tub.
 
**12. In the future, before adding the rainwater to the decomp tub, use the markings on the plastic tub to determine how many gallons and cups of water are needed. For example, with the tub used in this demonstration, it took 2 gallons and 3 cups to equal 1 1/2 inches of rain water.

1.5” of rain= 2 gallons 3 cups
**Steps with the double asterisk are intended to be used with the Decomp Project. If your students are conducting this activity as a stand-alone activity, you may omit these steps.

More Math Measurement: This activity will provide countless math extension opportunities. Track how many cups, pints, quarts or gallons of rain are poured onto your decomp tub. By the time yearly educational assessments roll around, your students will have mastered the related math objectives and had lots of fun while do so.
Check this blog frequently for additional activities to add to your Decomp Project.

This post is shared on the following blogs. Please check out their terrific ideas:

The Educators Spin on It