Tuesday, September 3, 2013

SYMMETRY: Balance in Nature, Balance in Education


SYMMETRY: Balance In Nature & Education
Butterflies: Nature's Ultimate Example of Symmetry
With cooler days ahead, it’s only natural that kids want to head outdoors for exploration. Today’s activity taps into children’s natural curiosity by striking a balance between building skills, adding to a child’s knowledge base, and having lots of fun while doing so.
Teaching the concept of symmetry can begin at any age. As soon as a toddler is able to walk, he taps into his own natural symmetry to navigate his environment. As a parent or teacher, you can use that awareness to help your child make connections to symmetry in the world around him.
Age Range: 4 to 7
Time to complete: 45-60 minutes
Subjects/Skills Addressed: science, math, physical education, fine motor skills
ACTIVITY DESCRIPTION: Children will use their reflections in a mirror to build understanding of bilateral symmetry. They will then gather leaves and use those leaves to identify lines of symmetry.

*Please note: For the purpose of this activity, when the term symmetry is used, it refers to bilateral or reflective symmetry.
MATERIALS:
Full length mirror
Removable painting tape
Symmetry stick (straw or other straight object that can be used to visually divide a leaf or flower.
Leaves of various shapes
Crayons
Scissors
Construction paper

INSTRUCTIONS:

1. Prior to completing the activity, place a vertical strip of green tape on the mirror that is a bit longer than your child’s height.
2. Have your child stand in front of the mirror so that he is visually divided in half by the tape.
3. Practice standing in various positions with both feet on the floor, keeping his head and arms balanced. Point out that each side of his reflection looks the same.
Ask: Is it easy to stand in one place when you look the same on both sides of the green tape? What do you think will happen if that changes?
4. Have your child raise his foot slightly. Then raise it higher.
Ask: Is it still as easy to stand in one place? Why do you think it takes more work to stand with only one foot?
5. Practice hopping on two feet and hopping on one foot.
Ask: Is it easier to hop on one foot or on two feet? Why?
6. Explain that when objects are balanced (have symmetry), they are able to stand better without falling. The same is true in nature.

Symmetry*: When you draw a line down the middle of something and both sides look the same, as if they are a mirrored reflection of each other.
7. Go on a nature walk to collect leaves and look at tree trunks. As you collect the leaves, use the symmetry stick to visually divide the leaves to see if they have symmetry. While many trees have leaves that are mainly symmetrical, there are trees with leaves that are naturally asymmetrical. Refer to the photos for examples of each.


8. Sort the leaves by whether they are or are not symmetrical. How many of each type are there?
 
AFTER THE NATURE WALK:

1. Use construction paper to create your own special type of Symme-Tree. Fold construction paper in half and cut free-form leaf shapes. This is not only a great way to practice fine motor skills, but it also reinforces the concept of lines of symmetry when the paper is folded and cut.


 2. Use the leaves that were gathered to create leaf prints by placing a leaf under a piece of paper and rubbing with the edge of a crayon. Once the rubbing has been created, use another crayon to draw the line of symmetry.

Another connection: Use wooden blocks to create towers that are balanced and towers that are not balanced. Which type of tower can be built higher? Count the number of blocks of each type of tower built.

DECOMP PROJECT: AFTER THE RAIN FALLS Phase 2


The trash has been collected. The trash has been taken to the dump. The late summer rains have started. In other words, the stage has been set.
Now that you and your students have buried the trash into the decomp tub, the seeds of curiosity have been planted. Your students, and maybe even you, are anxious to discover what will become of the treasures hidden beneath the soil. Over the next few months, take advantage of that curiosity and build an educational unit around it. In the process, your students will learn about their environment, their impact on the environment, and how to become better stewards of our beautiful blue planet.

Today’s post contains the continuation of the decomposition project with the posting of Phase 2: After the Rain Falls. For the sake of continuity, every time a new phase is added to the project, the preceding phases will be included as well. Whenever an adjunct activity is added, a link to the phases will be posted through an image.

WHERE WILL WE PUT ALL THIS STUFF? Phase 1
Link to previous post with all images.
Grade Range: K – 3
Time to complete: Preparation: varies, Activity: 60-75 minutes
Objectives:

Students will make predictions based on their prior knowledge about which items placed in a plastic tub will decompose.
Students will list and describe the conditions necessary for an object to decompose.
Students will gather and interpret data related to weather.
Students will read a grid map to locate and identify objects.
Students will identify and describe various types of soil based on appearance and physical properties.

Words to know: decompose, precipitation (rain, snow, sleet), weather, plastic, paper, metal, glass, measure

This project is designed as a cross-curriculum activity to address the environmental impact caused by the things we use for normal daily living. Students will conduct a year-long decomposition project, culminating with an excavation activity and seasonal planting, just in time for Earth Day in April. Additional, but optional, areas of study include weather patterns, regional climates, sorting materials, daily record keeping, identifying various forms of precipitation, grid and map reading skills, and implementing the scientific process.

MATERIALS:

Plastic tub with lid
Plastic tub the same size as the decomp tub (for activities conducted inside)
Wire snips
Ruler
Awl
String or thin ribbon
Dry soil from the area
Enough gallon size zipper bags to allow one for each student
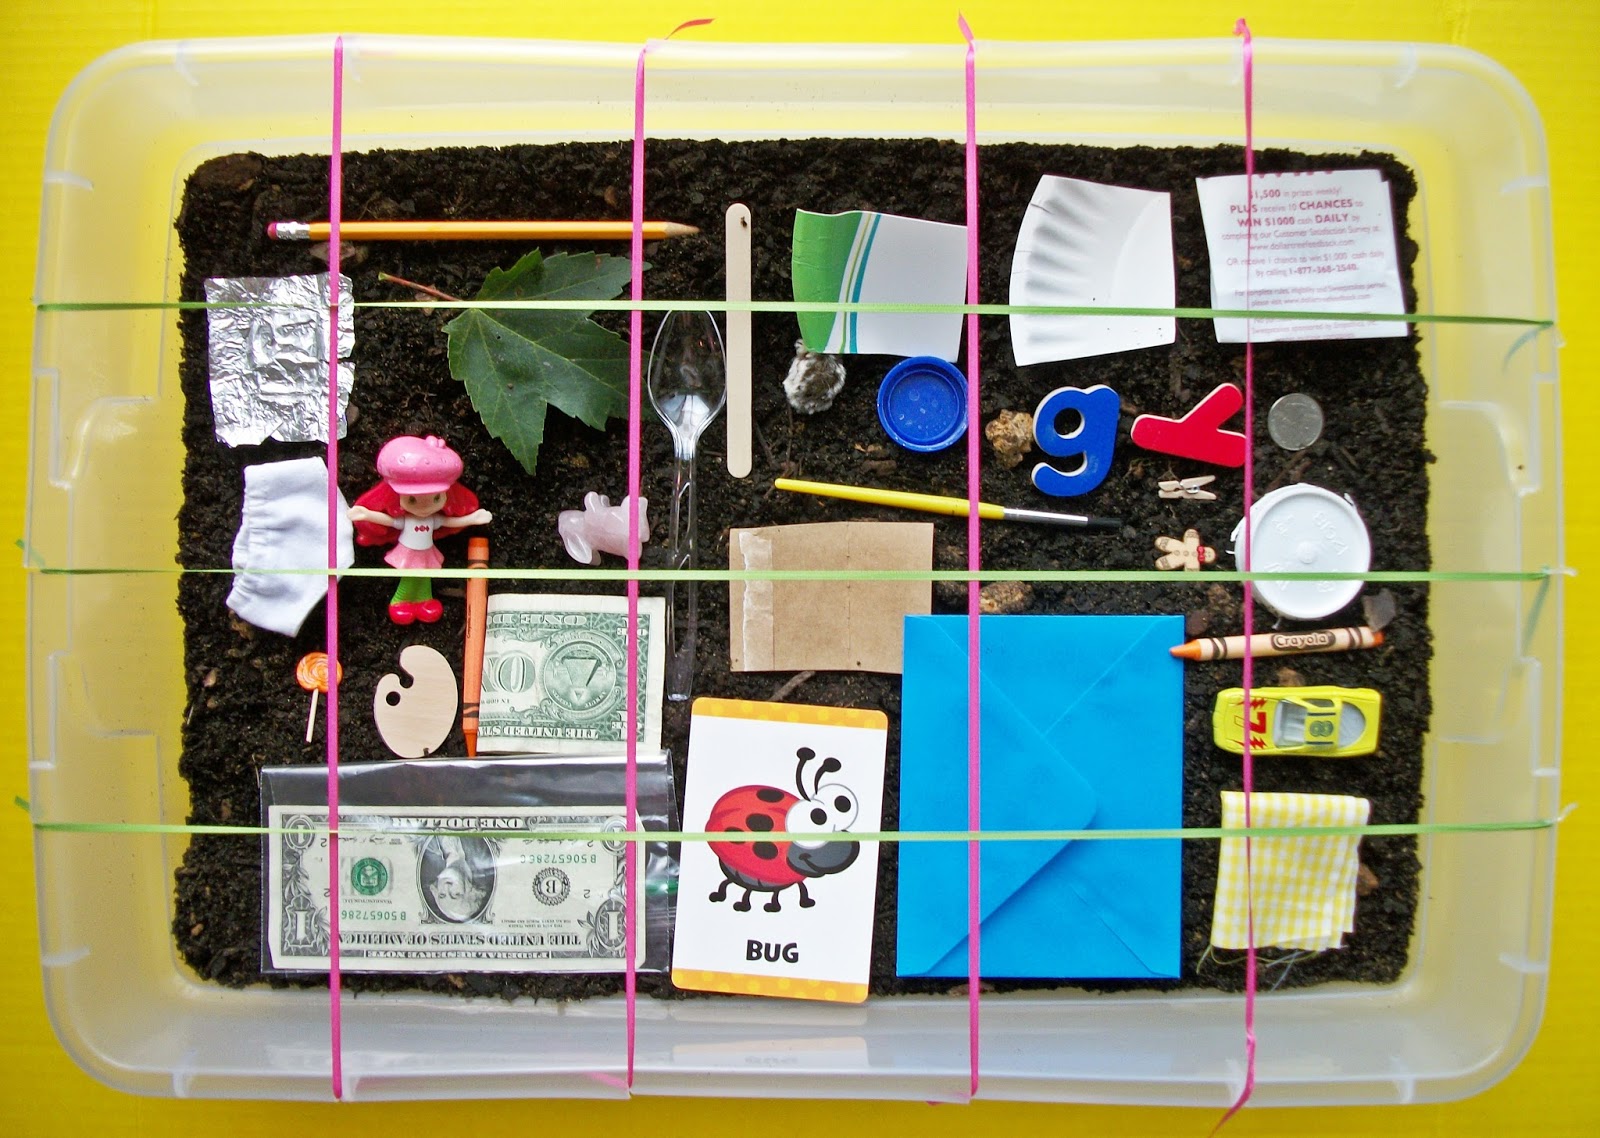
Various items to place into the tub of dirt of different materials (paper, cardboard, metal, plastic, cloth, glass, etc.)—i.e. trash
Rain gauge or plastic container (if project is conducted inside)
Plastic drop cloth for classroom (if project is conducted inside)
Camera (optional)

INSTRUCTIONS:
For demonstration purposes, the items placed in the decomp tub are geared towards a target audience of first to third grade students.

Preparation:
1. Prior to the activity, prepare the tub by cutting slots at regular intervals across the edges of the tub. These slots will be used to add the rope grid.
2. Using an awl or drill, add several small drain holes at the bottom of the tub. These will simulate natural drainage of many types of soil.
3. Involve the students in the preparation process:
a. Conduct a guided classroom discussion and collection of objects in your school that are made of various materials. Assign a homework project to bring in 2 small objects—one they predict will decompose and one object they predict will not.
b. Have each student bring in 2 cups of soil from their yard in a sealed plastic bag to place into the decomposition tub. Depending upon the size of tub used, you may need to supplement with soil from your yard. A follow-up activity based on this task will be added later in the year.

ACTIVITY:
1. If the project is conducted inside, place the plastic drop cloth on the floor.
2. Sort the items that were brought in by the students by material. If an object is composed of more than one type of material, choose the prominent material for the category.
3. Select the items to be placed into the tub. This step is a great springboard for a discussion on size as not all of the objects will fit into the tub. The goal is to select a sampling of material types. (Plastic, paper, cardboard, metal, glass, Styrofoam, coated paper, etc.) Set the selected items to the side while step 4 is completed.

*It helps to cut some of the larger items to a smaller size to allow room for more objects.
4. Fill the tub half way with the soil that was collected by the students. Mix the soil well with hands or a small shovel.
5. Arrange the items on the layer of soil, avoiding overlaps.
6. Add the string or ribbon grid to the tub. This will be used to help locate the items near the end of the project in the spring. Take a photo of the tub with the objects. This photo will also be used for a follow-up activity later this month.
7. Carefully add the remaining soil to cover the objects. There should be at least 2 to 3 inches of soil over the objects.
8. Place the rain gauge outside and wait for the next rainfall. If possible, set the decomp tub outside where it will receive the full effects of weather changes (sun, rain, wind, etc.)

*If the decomp tub is going to remain in the classroom, find a suitable area where the students can see the tub but it will remain undisturbed. Placement close to a window is also a good idea. Place the lid under the tub to catch the water that drains from the holes in the tub.
9. Check this blog for the next segment of this year-long project.

AFTER THE RAIN FALLS Phase 2

Grade Range: K – 3
Time to complete: Preparation: varies, Activity: 15-20 minutes, completed on a regular basis
This phase is, in essence, the meat of the project. It will take several months to complete, which will allow for many opportunities to provide related activities throughout the year. The phase focuses on the process of decomposition and the criteria necessary for decomposition to take place. As differences in regional climates may affect the decomposition process in your area, please take note of modification suggestions.

MATERIALS (continued from Phase 1):
Watering can
Ruler
Calendar
Wall chart (see sample)
INSTRUCTIONS:

Hint 1: This activity is conducted in an east coast community with a climate that experiences an average of 3 to 5 inches of rain a month. Summers are hot and humid.  Autumn weather varies, but are typically wet and warm. Winters are cool with infrequent snowfall. In order for decomposition to take place, the trash must be placed in a location where there is heat and moisture. If one of these components is missing, then the results may vary. If you live in an area that is cooler and/or drier, you might find this a good opportunity to reach out to schools or homeschool co-ops in different regions to use as a comparison for results. You could even set up 2 decomp tubs and control the climate effects for a direct comparison. This project is great for sharing with other students!
Hint 2: This activity is best conducted outside. However, if this is not possible in your area modifications are provided.

1. As soon as your area receives rainfall, bring the rain gauge inside. Measure the amount of rainfall. Add a color coded strip of paper to the wall chart rain gauge. For younger students, it helps to increase the size of the color blocks by a factor of 3. Each inch of rainfall is represented by a 3 inch strip of paper.
 
 
 2. Mark the calendar each time there is rainfall in your area.

*If the decomp tub remains outside, skip steps 3 and 4.

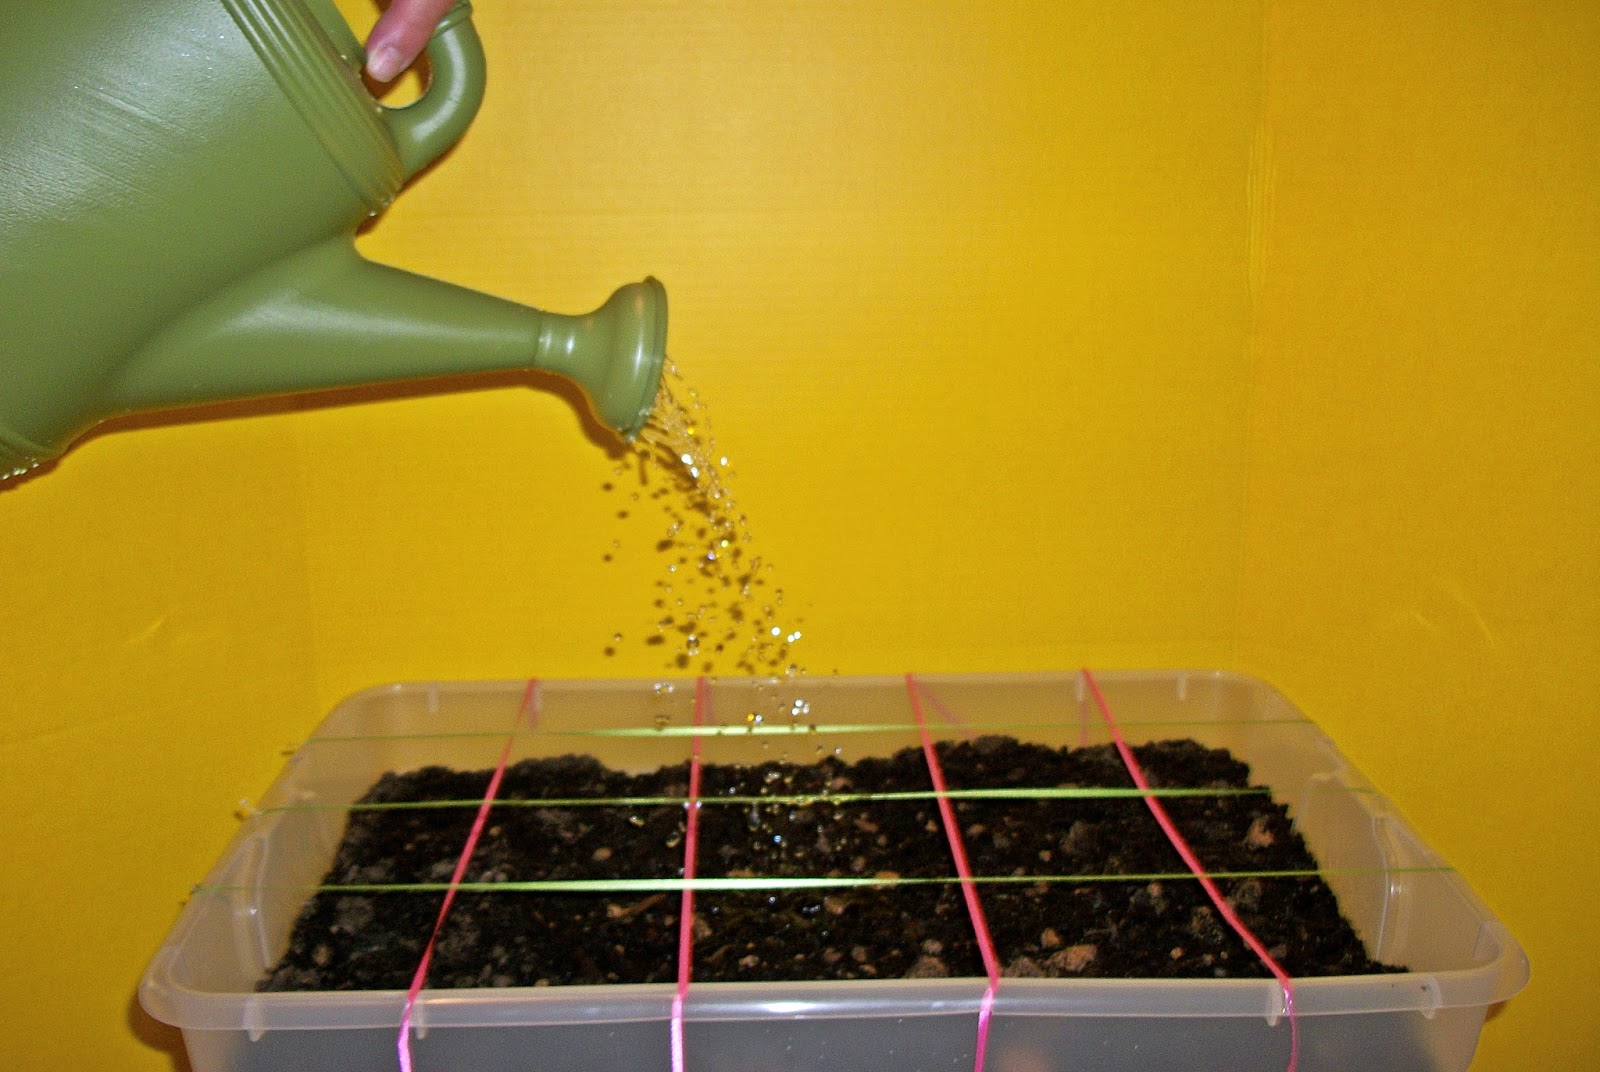
3. If the decomp tub is kept inside, fill the extra tub with the water level to match the rainfall total for the day. Pour the water into the watering can.

4. Take turns slowly pouring the water over the soil in the tub, making sure to wet all areas of the soil.
 
5. Explain to the students that water is necessary for the trash they buried to decompose.

6. Repeat these steps every time there is precipitation in your area. Adjustments for snowfall will be added at a later date.
For now, focus on tracking the amount of rainfall, the dates of each rainfall, and the daily high temperatures. Check back frequently for additional activities to be posted.

Just as with the process of decomposition, this project takes time.

Wednesday, August 28, 2013

DECOMP PROJECT: WHERE WILL WE PUT ALL THIS STUFF? Phase 1


Recycling bins, Save the Bay signs, and that all-too-familiar green circle of arrows—all a part of our daily lives. Children raised in this era of environmental responsibility have an advantage over past generations. Most children know the routine—remove the caps, rinse the bottle, and place it into the blue tub. Toy swap parties provide not only an afternoon of play with neighborhood friends, but they are also a way to share and replace toys that children have outgrown.
With this positive trend in mind, I present today’s year-long environmental impact project. For several years this project was part of my routine in both elementary and middle school classroom levels. The complexity of the project can be easily modified to suit the educational needs of your students.

WHERE WILL WE PUT ALL THIS STUFF? Phase 1
 

Objectives:
Students will make predictions based on their prior knowledge about which items placed in a plastic tub will decompose.
Students will list and describe the conditions necessary for an object to decompose.
Students will gather and interpret data related to weather.
Students will read a grid map to locate and identify objects.
Students will identify and describe various types of soil based on appearance and physical properties.

This activity is designed as a cross-curriculum activity to address the environmental impact caused by the things we use for normal daily living. Students will conduct a year-long decomposition project, culminating with an excavation activity and seasonal planting, just in time for Earth Day in April. Additional, but optional, areas of study include weather patterns, regional climates, sorting materials, daily record keeping, identifying various forms of precipitation, grid and map reading skills, and implementing the scientific process.

MATERIALS:
Plastic tub with lid
Wire snips
Ruler
Awl
String or thin ribbon
Dry soil from the area
Enough gallon size zipper bags to allow one for each student
Various items to place into the tub of dirt of different materials (paper, cardboard, metal, plastic, cloth, glass, etc.)
Rain gauge or plastic container (if project is conducted inside)
Plastic drop cloth for classroom (if project is conducted inside)
Camera

**Additional material requirements will be added as the project phases are added to this blog. Please check back for updates.
INSTRUCTIONS:

For demonstration purposes, the items placed in the decomp tub are geared towards a target audience of first to third grade students.
Preparation:
1. Prior to the activity, prepare the tub by cutting slots at regular intervals across the edges of the tub. These slots will be used to add the rope grid.
2. Using an awl or drill, add several small drain holes at the bottom of the tub. These will simulate natural drainage of many types of soil.

3. Involve the students in the preparation process:
a. Conduct a guided classroom discussion and collection of objects in your school that are made of various materials. Assign a homework project to bring in 2 small objects—one they predict will decompose and one object they predict will not.
b. Have each student bring in 2 cups of soil from their yard in a sealed plastic bag to place into the decomposition tub. Depending upon the size of tub used, you may need to supplement with soil from your yard. A follow-up activity based on this task will be added later in the year.

ACTIVITY:
1. If the project is conducted inside, place the plastic drop cloth on the floor.
2. Sort the items that were brought in by the students by material. If an object is composed of more than one type of material, choose the prominent material for the category.

3. Select the items to be placed into the tub. This step is a great springboard for a discussion on size as not all of the objects will fit into the tub. The goal is to select a sampling of material types. (Plastic, paper, cardboard, metal, glass, Styrofoam, coated paper, etc.) Set the selected items to the side while step 4 is completed.

*It helps to cut some of the larger items to a smaller size to allow room for more objects.

4. Fill the tub half way with the soil that was collected by the students. Mix the soil well with hands or a small shovel.
 
5. Arrange the items on the layer of soil, avoiding overlaps.

6. Add the string or ribbon grid to the tub. This will be used to help locate the items near the end of the project in the spring. Take a photo of the tub with the objects. This photo will also be used for a follow-up activity later next month.
 
7. Carefully add the remaining soil to cover the objects. There should be at least 2 to 3 inches of soil over the objects. If desired, add compass directions to the tub.


8. Place the rain gauge or plastic container outside and wait for the next rainfall. If your summer weather has been anything like ours, you won’t have to wait too long. J
9. Check this blog for the next segment of this year-long project.

Phase 2, AFTER THE RAIN FALLS, will be added in early September.
In the meantime, enjoy your end-of-summer holiday weekend.

Wednesday, August 21, 2013

PUT ON YOUR THINKING CAPS

In a time when budgets are trimmed, dollars are stretched, and educators are forever expected to do more with less, sometimes it helps to tap into free resources to add to your curriculum materials.

Today’s post is not actually an activity—the post is how to use a FREE resource to teach and reinforce many concepts in your classroom. With a little help from your students, you can quickly fill a tub with these handy dandy manipulatives and therefore have the materials necessary for countless center ideas.
 
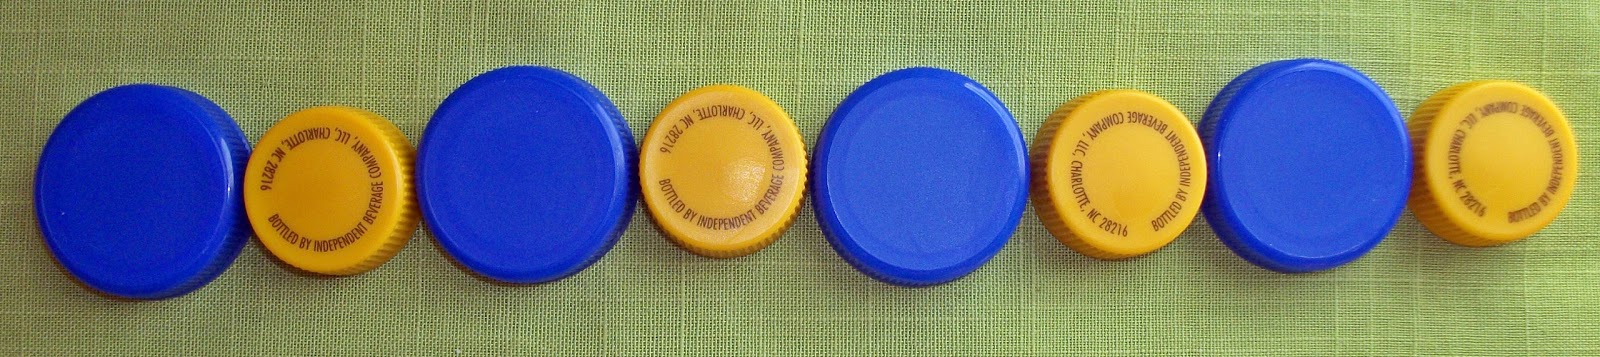
This resource of simple lids saved from common household objects can be used to teach many concepts at the preschool and primary levels. These activities can be used in a guided lesson or as a center activity.

MATERIALS:
Assorted plastic caps in multiple colors and sizes
Printout shown (optional)
 
INSTRUCTIONS:
1. Prior to using the tub of caps, assign your students the task of collecting clean plastic lids from home.
2. Create printouts of image provided to accompany the tub of caps.
3. Put on your own thinking cap and see how many ways you can use this FREE resource with your children. Here are just a few of the possibilities:
COLOR SORTING
COMPARING BY SIZE
ORDERING BY SIZE
IDENTIFYING ORDINALS
CREATING AND EXTENDING PATTERNS
CREATING NUMBER SENTENCES
PRACTICING FINE MOTOR SKILLS
SORTING BY SHAPE 
 
What concepts can you teach with this resource? 
 

This post was linked to: (Please check out her blog)

SeeSavannaCraft dot com

Wednesday, August 14, 2013

HOW CAN YOU MAKE A WHOLE HOLE?


It’s official.
It’s here.
The 2013 school year!
Whether you’re a mom of preschool-aged children, a homeschool parent, or a teacher in a public or private school, you knew the coming of the first day of school was inevitable. Over the next 10 months you will guide, inspire, encourage, and applaud the growth of the students in your care.

As you and your children embark on the educational adventure together, it is important to use the everything-you’ve-got approach to help assure the success of your children and their educational experience.
Today’s resource is not as much about the end product as it is the path taken to obtain the end product. Completing the activity will help each of us take a closer look at how we solve problems. An understanding of how we approach a task or challenge is, indeed, useful information that will help with educational planning.

So, put on your thinking cap (No, wait, that’s the next blog post scheduled a couple weeks from now!), relax, and take time to study the challenge, and complete today’s activity.
HOW CAN YOU MAKE A WHOLE HOLE?

How can you create a hole in an 8 1/2 x 11 piece of paper that is large enough to climb through?

Pushing your hand through it won’t work.
 
Forcing your foot through it won’t work.
 
If those methods don’t work, then reread the second paragraph of this post for a hint—use everything-you’ve-got!
USE ALL OF THIS!
Do you still need some help?
In a nutshell, or paper hole, this activity is a reminder of some of the many things necessary for a successful school year to take place.

1. Remember to use as many resources available as possible.
2. Remember to relax—our minds are better prepared to tap into our creativity when we are calm.
3. Achieving success takes time. Children master skills at different rates. Adjust for this.
4. Turning bigger goals into several smaller goals helps assure success.
5. Approach challenges from more than one direction.
6. When we teach children, we must remember that everyone needs help from time to time. If you can’t determine the best way to help a child master a skill, possibly a colleague, friend, or even a student can devise a teaching strategy that will work.

Remember that you have a whole year ahead of you. Next spring you will look back on this month and wonder why you were the least bit apprehensive about SY 2013-2014.
That being said, grab your scissors and use this photo tutorial as a way to grab your students’ attention this year. How many students can fit through a hole in an 8 1/2” by 11” piece of paper?


THINK: HOW DO I USE AS MUCH SURFACE AS POSSIBLE?


Sunday, August 4, 2013

HOW TO CREATE A MINI-BOOKLET


It’s August! Summer activities are winding down. Preparations for the fall routine are winding up. If you’re like many parents, teachers, or homeschool co-op coordinators, you are probably being bombarded with educational ideas and resources. Basically, the very things meant to make education planning easier are having the opposite effect.
With the over-the-top school whirlwind in mind, this month will be light on posts, light on ideas, and light on materials. The only resource used—paper.
Paper is truly a wonderful resource:
It’s readily available.
It’s fairly inexpensive.
It’s incredibly versatile.
The idea for today is how to use a single sheet of paper to organize, retell, sequence, and review—all in one handy dandy pocket-sized mini-booklet.
HOW TO CREATE A MINI-BOOKLET

While this paper-based resource is not new, in our techno-gadget society, many of us have forgotten how utterly simple and amazingly useful paper is. Your children, students, and maybe even you will find this 8.5 x 11 creation a terrific alternative to tablets and computer screens.

MATERIALS:
A piece of blank paper (8.5 x 11 used for demonstration)
Scissors
INSTRUCTIONS:
Hint: The numbers were added to aid in the visual portion of the instructions.

1. Fold the paper in half, horizontally, scoring the fold with your fingernail. (2 sections created)
 
2. Fold the paper again, vertically, scoring the fold with your fingernail. (4 sections created)

3. Fold the paper again, vertically, scoring the fold with your fingernail. (8 sections created)
 
4. Open the paper to reveal the scored fold lines.

5. Refold the paper, horizontally, as in step 1. This will leave 4.25 x 11 strip of paper with 3 scored lines and 4 sections of paper, as shown. 

6. Using scissors cut the paper on the fold line between the first and third scored lines, as shown.
 
7. Carefully open the paper pulling the 2 middle score lines apart until the sections meet in the middle creation 4 individual sections, as shown.
 
8. Fold the paper into the finished booklet, as shown.
 
The finished product is mini-booklet with a cover and 6 interior pages.