Showing posts with label science. Show all posts

Monday, February 10, 2014

How Can You Teach RATIOs with Snow?

Winter definitely continues to grasp many areas of North America. And, just like my family, I am certain that your family is eager for blustery spring winds to blow away those pesky snow clouds.
Hopefully, it won’t be too long before the light and fluffy snowflakes will be replaced by an ample supply of raindrops—the perfect way to wash away the gray of winter.
This anticipation of spring is a great opportunity to provide not only a science lesson but also a fun way to demonstrate the concept of ratios. By using the relationship between snowflake density and raindrop density (i.e. the Snow Water Equivalent), the kiddos can practice using ratios, skip counting, and multiplication.
Why not go outside, scoop up a bucket of fresh fallen snow, and have some winter-spring transition fun.
HOW CAN WE USE THE SNOW WATER EQUIVALENT TO TEACH RATIOS?
“IT’S A RATIO.”
“HORATIO WHO?”
Every time I hear the term ratio, I recall the scene where Opie and Andy Taylor discuss ratios. Opie, most likely in the first grade, does not understand the term. In fact, many children in K-2 have difficulty grasping the concept. Add this confusion to the concept of comparing snowfall amounts with rainfall amounts, and you have a recipe for a flood of misunderstanding.
This activity addresses both concepts in a fun yet scientific manner. Finish it off with a snow cone treat and your children are bound to forever remember that it takes a lot of snow to equal an inch of rainfall!
ACTIVITY DESCRIPTION: Children will observe changes in density by melting snow. They will then use the melted snow to determine the ratio of rain to snow. Children will use that information to predict how much rainfall there would be if their area received rain instead of snow.
MATERIALS:
Fresh snow (or shaved ice if no snow is available-results will vary)
Clear plastic cup
Clock and timer
Printouts of raindrops and snowflakes
Camera (optional)
INSTRUCTIONS:
1. Prior to the activity, fill the plastic cup with either snow or shaved ice. Show the cup to your children.
 
 
Explain that when snow melts into water, the density (a measure of how compact an object is) will change.
Ask: When this snow melts, how much water will there be in the cup?
2. Place the cup on flat surface and take a photo of it.
3. Record the time that the observation begins and set the timer for 30 minutes.
4. When 30 minutes have passed, look at the snow and record any changes. Take a photo. Set the timer for 30 minutes.
 
 
5. Repeat step 4 until the snow has melted.
6. When the snow is melted compare the children’s predictions with the actual amount of liquid in the cup.
Ask: How long did it take for the snow to melt? Why is there less spaced filled in the cup? What could change the rate of melting? (Ex: placing the cup in the sun, in front of a fan, etc.)
EXPLANATION:
When snowflakes combine with other snowflakes, there is air between each one. When the snowflakes melt, air is released, causing the water contained in the snowflakes to take up less space. The snow and the liquid have the same mass (stuff), but have different density.
 
7. Use the printouts of the snowflakes and raindrops to represent the ratio of inches of snow to the corresponding inches of rain, as shown.


8. Discuss the differences that could happen if the snowfall fell on a different day. For example, when temperatures rise, snowflakes have a greater density. Therefore, the ratio of snowfall to rainfall would change.
9. Complete the lesson by making snow cones. Remind the children that while their snow cone cups may appear full, there is very little water inside.
EXTENSION ACTIVITIES:
1. Completion of the snow melting portion of this activity provides an opportunity to reinforce telling time to the hour and half hour. Children in K-1 can use the photographs created by the experiment to sequence the melting process and matching the corresponding time to the correct image.
2. This lesson also provides and excellent opportunity to practice skip counting and multiplication. Print multiple copies of the raindrop and snowflake printables to use with both concepts. It is also possible to begin basic algebra concepts by replacing the snowflake with S and the raindrop with R.

Wednesday, October 2, 2013

DECOMP PROJECT: What Happened to the Rain?


Okay. What happened to the rain? June, July, and August on the east coast brought rain, rain, and more rain. September, on the other hand, proved to be quite dry—less than 2 inches of rain fell in my town. If your area was as dry as ours, don’t fret—you can use this information to address the much-discussed topic of climate change.
Now that the first month of record keeping for your decomp project is behind you, it’s time to read and interpret this data. Today’s post is mainly a suggestion for a direction to take with regards to using the data collected for the month of September. If your students are in kindergarten, then they will learn from this data at a different level than students in third grade. Think of this data as a teaching tool and modify these tools to suit the needs of your students.
SUGGESTIONS FOR DATA USE

All month your class has faithfully used the calendar to record the amount of rain that fell. Cover each block of the calendar with color-coded sticky notes, one to represent a day with precipitation, one to represent a dry day. 


1. Count the total number of days that received rainfall.
2. Count the total number of days in between each day that received rainfall. What was the longest time period without rain? The shortest?

3. Were there any weeks where no rain fell?
4. Remove the sticky notes and create a ratio chart. For example, for our area, it rained 3 days out of thirty: It was dry 27 days out of 30. For every day that it rained, there were 9 days that it didn’t rain.

3:30 (ratio of rain days to total days)

3: 9 (ratio of rain days to dry days)


5. Add the total daily rainfall totals to the sticky notes. Add the amounts to obtain the total rainfall for the month. Conduct an internet search to compare rainfall totals September 2013 with the average for the year. Here is a great link to find the totals.

Weather dot Com

Remember to continue adding rainfall to your indoor ‘rain gauge’.

Now that the record keeping is finished, why not head over to some of the other blog posts for Halloween fun and giveaways.

Monday, September 16, 2013

DECOMP PROJECT Connection Activity: Ignite Their Curiosity with Water

Now that a couple of weeks have passed since your students took out the trash (i.e. buried items in their decomp tub), it is almost certain that your students have begun to ask questions.

“What’s happening under the dirt?”
“Why do we have to add water to the dirt?”
Or, better yet…
“WHEN can we dig up the trash?”
These are all good questions that will encourage your students to seek answers.
Today’s connection activity will answer one of those questions, but will also motivate your students to pose more questions to be answered as the Decomp Project continues.
The following activity is a demonstration on the breakdown of material that occurs during decomposition. While this is not a complete example of the decomposition process, the activity will serve to illustrate one very important fact.--The plastic in our world affects many aspects of our lives.

IGNITE THEIR CURIOSITY WITH WATER

Grade Range: K – 3
Time to complete: 20-30 minutes
VA STANDARDS of LEARNING: SCIENCE K.1, 1.1, 1.3, 2.1, 3.1, 3.10

The purpose of this activity is to provide a visual example of how paper breaks down when it is exposed to water.
ACTIVITY DESCRIPTION: Students will place several types of paper into a water bath (one set placed directly into the water and the other set protected in a sealed plastic bag) and shake the contents of the water bath. They will compare the results of the paper that is directly placed in the water with the paper that is contained in plastic. They will then make predications about some of the items that are buried in the decomp tub.

MATERIALS:
3 Pint-sized plastic containers with lids
1 cup measuring cup
3 cups water
2 4” x 4” squares of toilet paper
2 4” by 4” squares of bargain brand notebook paper
2 4” x 4” squares of bargain brand paper towels
3 zippered sandwich bags
2 cups dry soil
Small strainer

INSTRUCTIONS:
1. Prior to the activity, prepare the materials by placing one of each type of paper into a sandwich bag and sealing it.

2. Conduct a discussion about paper and what paper is made from (wood pulp or recycled paper).
3. Pour 1 cup of water into a plastic container.
4. Place a plain piece toilet paper into the water and put the lid onto the container.
 
5. Shake the container vigorously for 30-45 seconds. Note any changes in the paper.
 
6. Using the strainer, drain the water from the paper pulp that was created. Set this pulp aside for later.

7. Repeat steps 3-5, substituting the toilet paper in the sealed plastic bag into the water. Hint: The paper in the sealed plastic bag should remain dry and unchanged.

8. Continue steps 3-5, substituting the remaining paper that is pictured above.
Ask: Why did the paper in the plastic bags stay in one piece? Why did some of the plain paper (not sealed in plastic) take longer to break into smaller pieces?
9. Take the pulp that was strained in step 6, add it to the dirt, and mix well. Take the plastic bags with the paper sealed inside and ‘stir’ them into the dirt. Discuss why stirring the sealed bags doesn’t work as well.

 
Explain that when water is added to the decomp tub, some of the items might change. It will take longer than it did today, but there will be changes by the end of the year.
Ask: What items in our decomp tub do you think will change by the end of the school year? What items in the decomp tub do you think will not change? Why?
 
10. Make a list of the predictions to display beside the predictions made at the beginning of the Decomp Project. Discuss any changes in the predictions.

EXTEND THE LEARNING; EXTEND THE DISCOVERY; EXTEND THE FUN:
Now that your students are beginning to comprehend the process of decomposition, plant more seeds of curiosity.
Ask the students what happens when the plastic trash bags that every home, every school, every store, every restaurant, every—well, you get the idea, EVERYONE uses gets taken away by the trash trucks. More activities based on this very important question will be added to the Decomp Project later in the year.

For now, however, the pulp that was created (and possibly more paper pulp from your classroom recycle box) can be used to create their OWN paper. Your students will have fun while they are adding to their awareness of their impact on the environment.

The video below is a fantastic demonstration of the paper making process.


Wednesday, August 28, 2013

DECOMP PROJECT: WHERE WILL WE PUT ALL THIS STUFF? Phase 1


Recycling bins, Save the Bay signs, and that all-too-familiar green circle of arrows—all a part of our daily lives. Children raised in this era of environmental responsibility have an advantage over past generations. Most children know the routine—remove the caps, rinse the bottle, and place it into the blue tub. Toy swap parties provide not only an afternoon of play with neighborhood friends, but they are also a way to share and replace toys that children have outgrown.
With this positive trend in mind, I present today’s year-long environmental impact project. For several years this project was part of my routine in both elementary and middle school classroom levels. The complexity of the project can be easily modified to suit the educational needs of your students.

WHERE WILL WE PUT ALL THIS STUFF? Phase 1
 

Objectives:
Students will make predictions based on their prior knowledge about which items placed in a plastic tub will decompose.
Students will list and describe the conditions necessary for an object to decompose.
Students will gather and interpret data related to weather.
Students will read a grid map to locate and identify objects.
Students will identify and describe various types of soil based on appearance and physical properties.

This activity is designed as a cross-curriculum activity to address the environmental impact caused by the things we use for normal daily living. Students will conduct a year-long decomposition project, culminating with an excavation activity and seasonal planting, just in time for Earth Day in April. Additional, but optional, areas of study include weather patterns, regional climates, sorting materials, daily record keeping, identifying various forms of precipitation, grid and map reading skills, and implementing the scientific process.

MATERIALS:
Plastic tub with lid
Wire snips
Ruler
Awl
String or thin ribbon
Dry soil from the area
Enough gallon size zipper bags to allow one for each student
Various items to place into the tub of dirt of different materials (paper, cardboard, metal, plastic, cloth, glass, etc.)
Rain gauge or plastic container (if project is conducted inside)
Plastic drop cloth for classroom (if project is conducted inside)
Camera

**Additional material requirements will be added as the project phases are added to this blog. Please check back for updates.
INSTRUCTIONS:

For demonstration purposes, the items placed in the decomp tub are geared towards a target audience of first to third grade students.
Preparation:
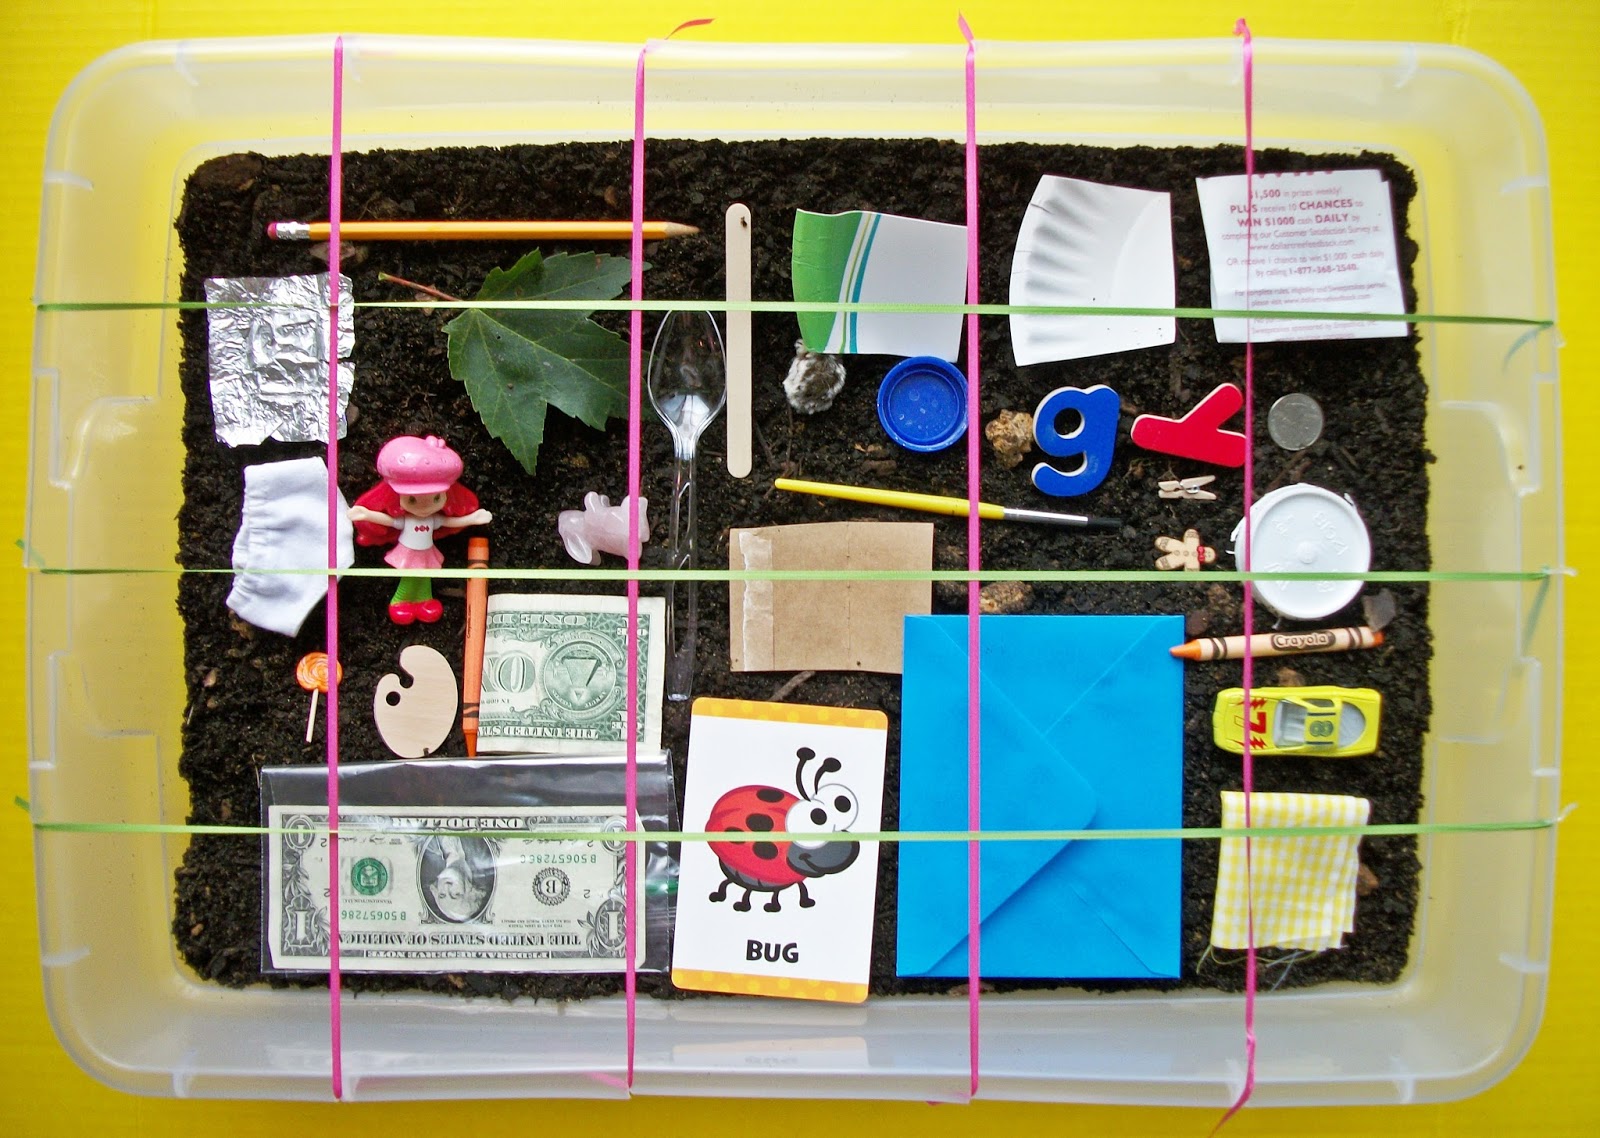
1. Prior to the activity, prepare the tub by cutting slots at regular intervals across the edges of the tub. These slots will be used to add the rope grid.
2. Using an awl or drill, add several small drain holes at the bottom of the tub. These will simulate natural drainage of many types of soil.

3. Involve the students in the preparation process:
a. Conduct a guided classroom discussion and collection of objects in your school that are made of various materials. Assign a homework project to bring in 2 small objects—one they predict will decompose and one object they predict will not.
b. Have each student bring in 2 cups of soil from their yard in a sealed plastic bag to place into the decomposition tub. Depending upon the size of tub used, you may need to supplement with soil from your yard. A follow-up activity based on this task will be added later in the year.

ACTIVITY:
1. If the project is conducted inside, place the plastic drop cloth on the floor.
2. Sort the items that were brought in by the students by material. If an object is composed of more than one type of material, choose the prominent material for the category.

3. Select the items to be placed into the tub. This step is a great springboard for a discussion on size as not all of the objects will fit into the tub. The goal is to select a sampling of material types. (Plastic, paper, cardboard, metal, glass, Styrofoam, coated paper, etc.) Set the selected items to the side while step 4 is completed.

*It helps to cut some of the larger items to a smaller size to allow room for more objects.

4. Fill the tub half way with the soil that was collected by the students. Mix the soil well with hands or a small shovel.
 
5. Arrange the items on the layer of soil, avoiding overlaps.

6. Add the string or ribbon grid to the tub. This will be used to help locate the items near the end of the project in the spring. Take a photo of the tub with the objects. This photo will also be used for a follow-up activity later next month.
 
7. Carefully add the remaining soil to cover the objects. There should be at least 2 to 3 inches of soil over the objects. If desired, add compass directions to the tub.


8. Place the rain gauge or plastic container outside and wait for the next rainfall. If your summer weather has been anything like ours, you won’t have to wait too long. J
9. Check this blog for the next segment of this year-long project.

Phase 2, AFTER THE RAIN FALLS, will be added in early September.
In the meantime, enjoy your end-of-summer holiday weekend.